
Dimensions
Dimensions let you tag transactions and journal lines with a second layer of coding that sits alongside the chart of accounts — a property, a branch, a job, a department. Once transactions are tagged, you can filter any report to one property, or break a Profit & Loss into a column per property, without splitting the client into separate entities. If you have come from Xero, these are Tracking Categories; MYOB calls them Departments and QuickBooks calls them Classes.
The difference worth knowing about: you can make a dimension mandatory. Set a dimension to Required and Prosaic will not let a transaction be reconciled without one — so a property-segmented P&L is complete by construction, rather than complete only if everyone remembered.
How dimensions work
A dimension is the thing you are tracking — Property, Branch, Job. Each dimension holds a list of options — the actual values, like 12 Morton St or Auckland.
Every journal line can carry at most one option per dimension. A line can be tagged 12 Morton St and Maintenance at the same time, because those are two different dimensions — but it can never be tagged with two properties. That constraint is enforced in the database, and it is what makes a segmented report add up: every dollar lands in exactly one column.
An entity can have up to five active dimensions. In practice, two or three is usually plenty.
Setting up a dimension
Go to Workspace → Dimensions. The list has two tabs:
- Entity — dimensions that are live on a particular entity, with their type, enforcement level and option count.
- Templates — workspace-level definitions you can reuse across entities. Templates show how they reach entities and how many they have reached so far.


Click Create dimension to start.
Type and display name
Pick a Type first — Property, Location, Department, Project, Activity, Product / service, or Other. The type is what Prosaic understands the dimension to mean; it decides what extra information each option can hold. Choosing Property, for example, gives every option a set of address fields.
The Display name is entirely yours. A Department-type dimension can be shown as Branch, Team, Cost Centre or Programme — the name defaults to the type's label, and you can overwrite it. If you pick Other, you will be asked for a short description of what you are tracking.
The type locks once the dimension has its first option, since changing it would orphan the information already captured against each option. The one exception is promoting Other to a real type — that is allowed at any time.

Enforcement
Choose how strictly the dimension must be tagged during reconciliation:
- Off — tagging is optional, with no prompts.
- Warn — untagged transactions show a warning but can still be reconciled. This is the default and the right starting point for most dimensions.
- Required — transactions must be tagged before they can be reconciled.
You can change the level later, so there is no need to commit to Required on day one. A common pattern is to start on Warn, watch how consistently the tagging happens for a period, then tighten it.
Adding options
Under Options, add each value the dimension can be tagged with. For a Property-type dimension you also get Address line 1 and 2, Suburb or town, Region, Postcode and Country against each option. Filling the address in is optional, but it is worth doing — that information can only be captured at the time, and it opens the door to per-property reporting and benchmarking later.

Templates: define once, use across clients
If the same dimension applies across a number of clients, switch on Make this a template?. Templates are defined once at the workspace level, and Advanced settings → Automatic application controls how they reach entities:
- Not applied automatically — the template sits unassigned until you add it to an entity yourself. This is the default.
- Entities on chart templates — every entity using the chart templates you select receives it, including new ones.
- Entire workspace — every entity in the workspace receives it, including entities created later.
When a template reaches an entity, Prosaic copies the dimension and its options down to that entity, so each client's coding stays their own while the definition stays consistent across the practice.

You can also manage an individual client's dimensions from the entity's own Dimensions tab, and pick up extra templates when you create an entity.
Tagging transactions
Once an entity has dimensions, they appear wherever coding happens.
In the transactions list
Filter the list to a single entity and you get a column for each of that entity's dimensions, next to Account and Tax. Click a cell to search and pick an option, exactly like coding an account. When several entities are in view, the dimensions collapse into a single Dimensions column showing a count of the tags on each row.


Tagging a transaction before it is reconciled is safe — Prosaic remembers the tag and carries it onto the journal line when you reconcile.
When reconciling and splitting
The reconcile dialog carries the same pickers, and on a split each line is tagged independently — so a single payment can be apportioned across two properties and reported correctly against both.
In manual journals
Create a journal, choose the entity, and a column appears for each of that entity's dimensions alongside Account and Tax Rate. Every line that carries an amount can be tagged.

Journals have to balance within each dimension option
A journal balances twice over. Debits equal credits overall, as always, and they also have to equal each other within every dimension option the journal uses. Tag one line with a property and leave the other side blank and the journal will not post, because a Balance Sheet filtered to that property would then show a debit with nothing on the other side of it.
Here is the case that catches people out. The journal below balances in the ordinary sense, $200 against $200, but Property 1 carries the debit and nothing carries the credit:
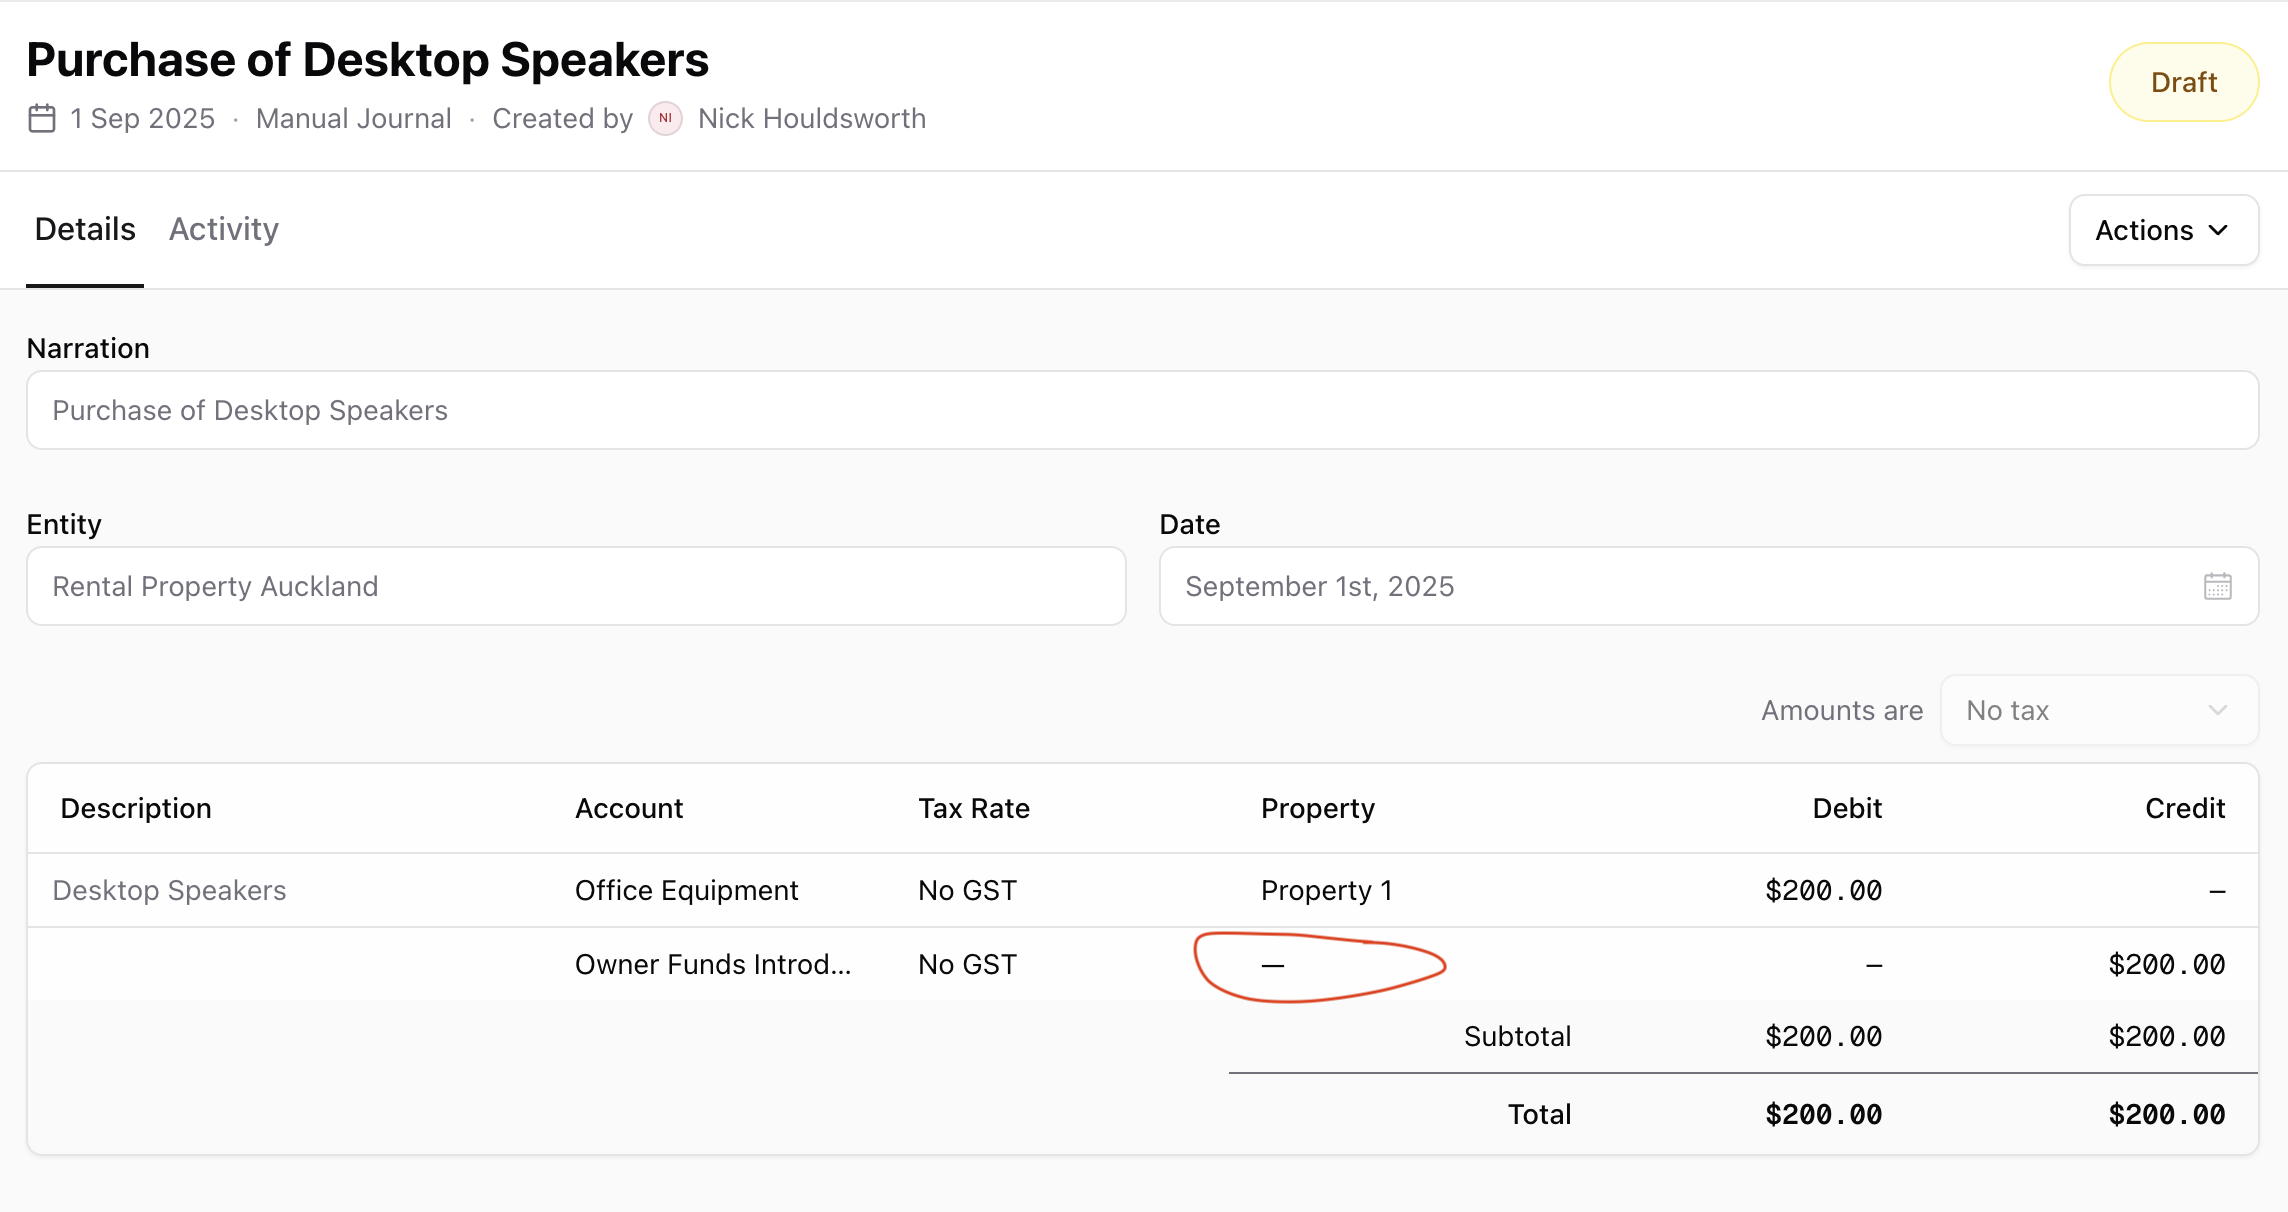
Setting Property 1 on the second row as well is the whole fix. A journal with no tags at all is fine too; the rule only bites once an option appears on one side and not the other.
The check runs on every account, not just Balance Sheet ones. Two P&L accounts against each other still have to balance within an option. Applying the rule everywhere keeps a dimension-filtered report reliable no matter which accounts a journal happens to touch.
You will not meet this on bank reconciliation. When you tag a reconciliation, Prosaic tags the bank side of the journal to match, and splits it line by line where you have split the transaction, so each option balances on its own without you thinking about it. Manual journals are the one place you set both sides yourself.
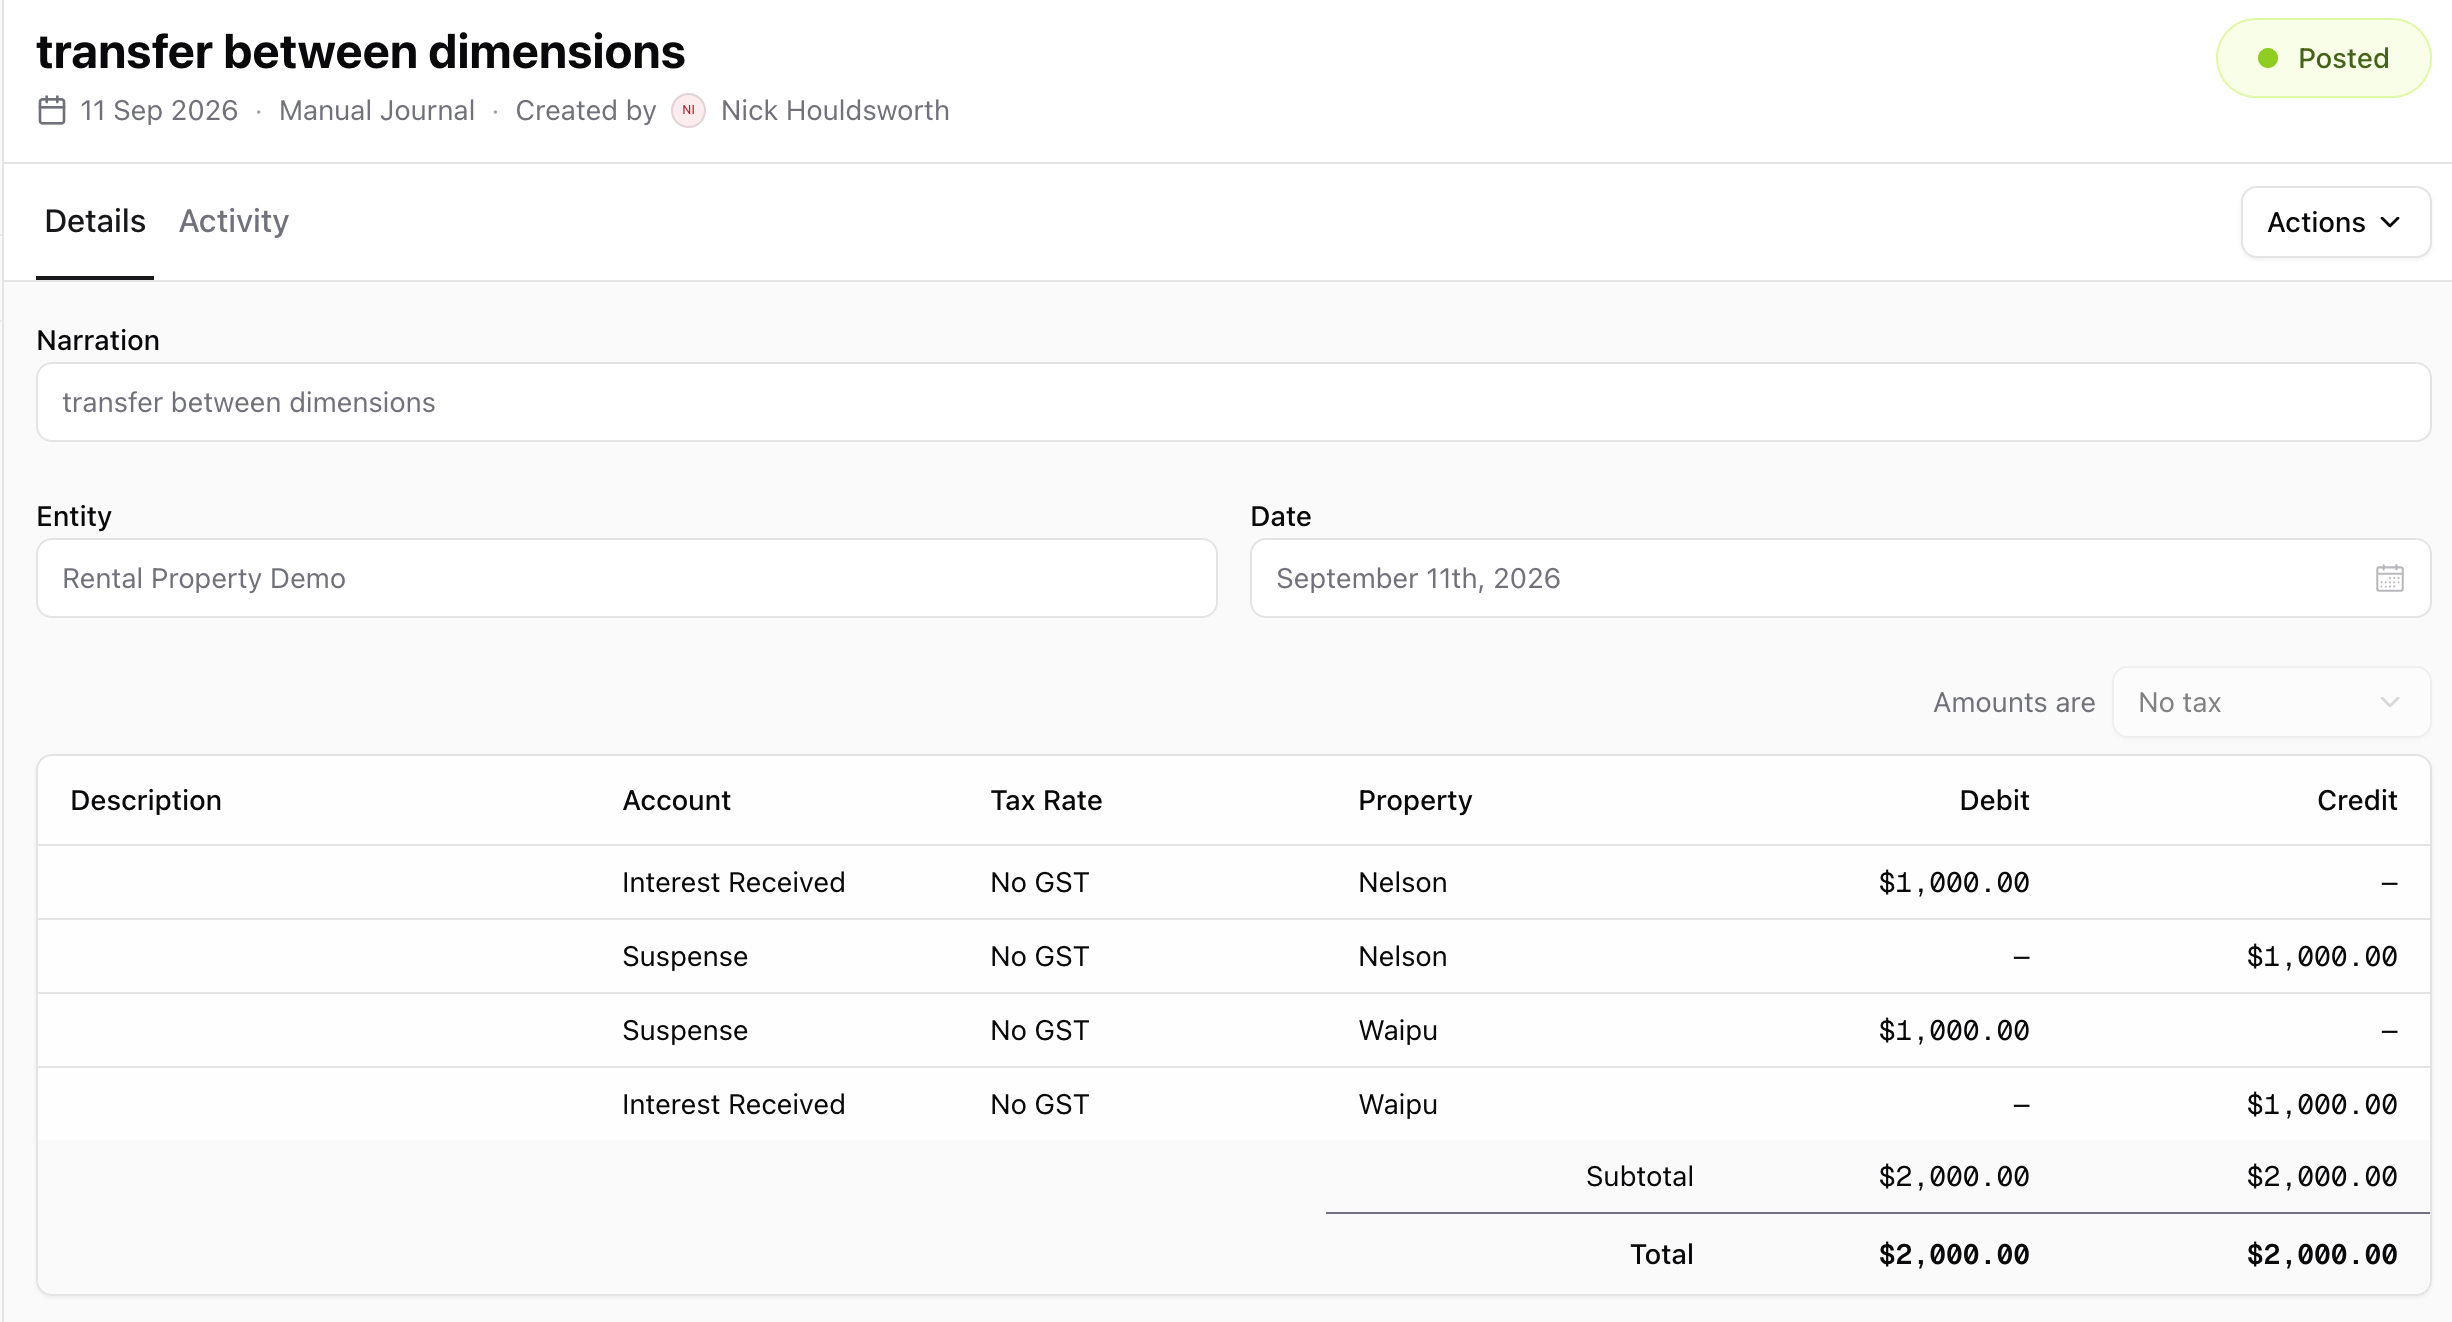
Recharges between options. Moving a cost from one property to another takes four lines rather than two, with a clearing account carrying the balance across:
- Against the first option, credit the expense and debit a clearing account.
- Against the second option, debit the expense and credit the same clearing account.
Each option now has equal debits and credits, and the clearing account nets to nil across the journal, so it leaves nothing behind on the Balance Sheet.
What you see when something is missing
Uncovered dimensions are flagged in the coding cell as you work — Missing in amber for a Warn dimension, Required in red for one you must fill in.
When a Required dimension has no option on a row, that row's OK button is greyed out until you pick one; hovering it names what is missing. In the reconcile and split dialogs the check runs line by line and saving is refused with the same explanation. Journals behave the same way — every line carrying an amount must be tagged before the journal can be created.

Tagging that looks after itself
Tagging every transaction by hand is the part of dimensions that wears thin fastest. Three things now do most of it for you, and each one leaves the final say with you.
Suggestions from what you have already tagged
Once you have coded the same merchant a few times, Prosaic starts filling the dimension cells in for you. It looks at how this entity has tagged that merchant before, and when the answer has been consistent it offers the same option on the next transaction, alongside the account and tax rate it already suggests.
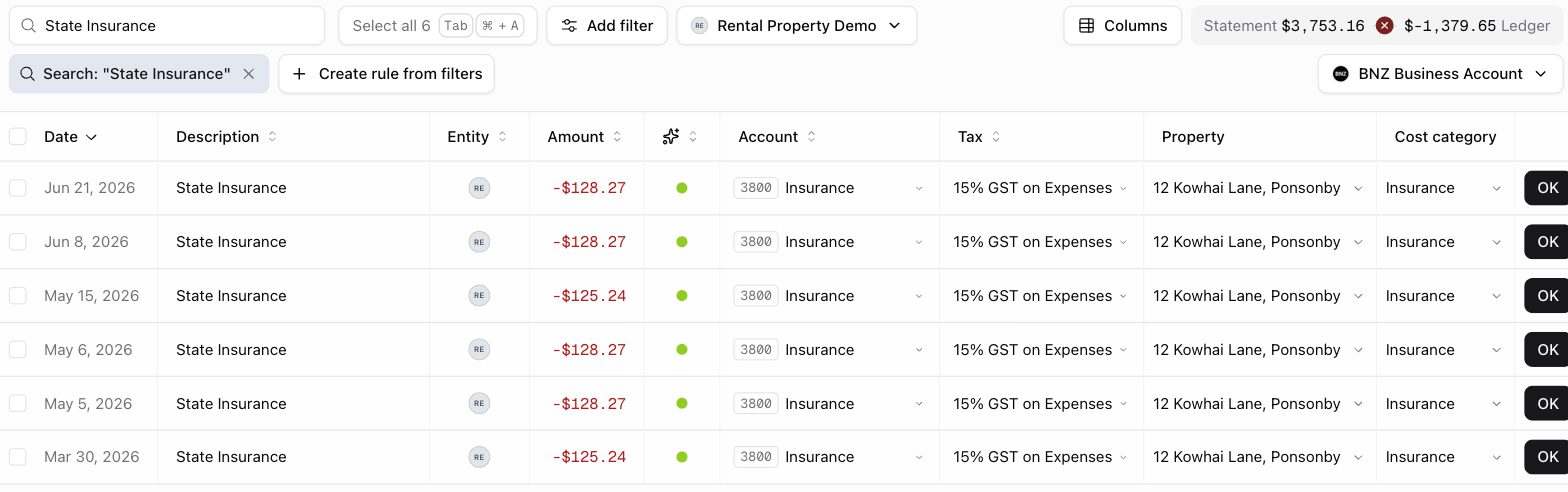
These are suggestions, not decisions. The option sits in the cell so you can see exactly what OK is about to write, and you can change it, clear it, or reconcile straight through. An option you have picked yourself always wins: once a transaction carries your own tag, that is what reconciles, and the suggestion steps aside.
It stays quiet unless it has good reason to speak. A merchant needs at least three reconciliations behind it, and if your tagging of that merchant has been split between two options, Prosaic offers nothing rather than guess.
Rules that tag
Where the pattern is a standing instruction rather than a habit, write a rule. Rules can now apply dimension tags as well as post a journal, or do nothing but tag. In the rule editor, under Actions, choose Apply dimensions and pick the option you want set for each dimension.
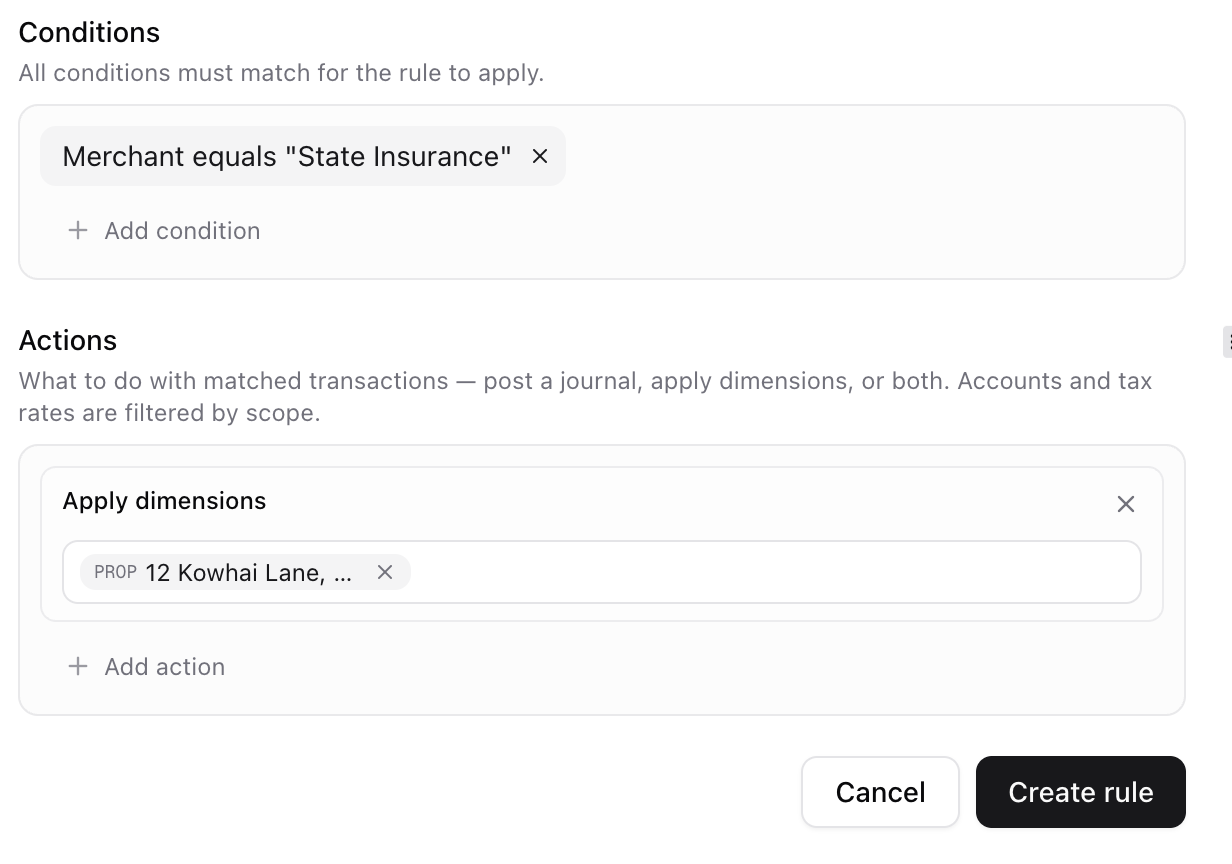
A rule that only tags posts nothing at all, so it leaves the account and the tax rate to the usual suggestions instead of deciding them for you. Its tags arrive on the transaction the same way a suggestion does, and they take priority over anything recalled from history for the same dimension, because a rule is something you asked for.
Tags are set once for the whole rule rather than line by line, which covers the "which property is this?" case these rules are mostly written for. In the rules list, a tagging rule reads as Dimension • Property: 12 Kowhai Lane, Ponsonby under Actions, so you can see what it does without opening it.

Rules Prosaic suggests
Prosaic also watches for patterns that look like a rule waiting to be written. Go to Workspace → Rules with a single entity in view, and if this entity has tagged a merchant the same way often enough, a Suggested dimension rules panel appears above the list.
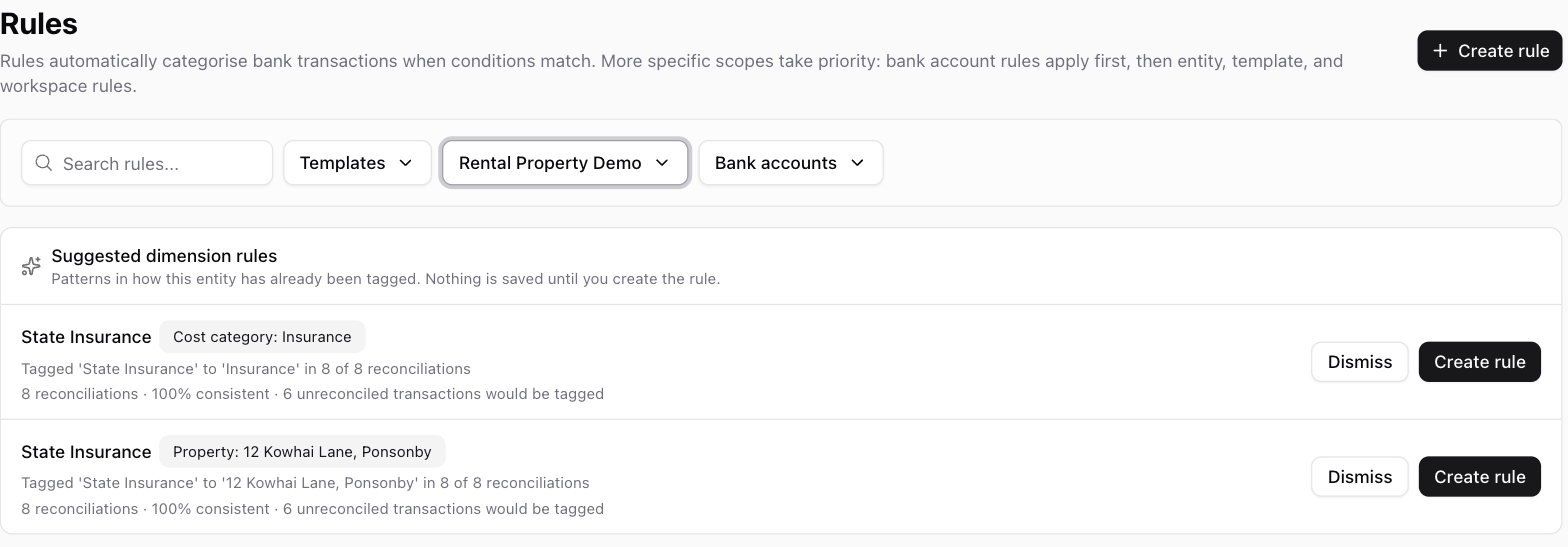
Each suggestion tells you what it saw and what it would do next: how many reconciliations it is based on, how consistent they were, and how many unreconciled transactions the rule would tag if you created it. The bar is deliberately high, at least five reconciliations with at least 90% of them agreeing, so the panel stays empty unless there is something genuinely worth writing down.
Dismiss takes a suggestion away and it will not be offered for that merchant and dimension again. Create rule opens the ordinary rule editor with the name, scope, condition and tag already filled in, along with a preview of the transactions it would match.
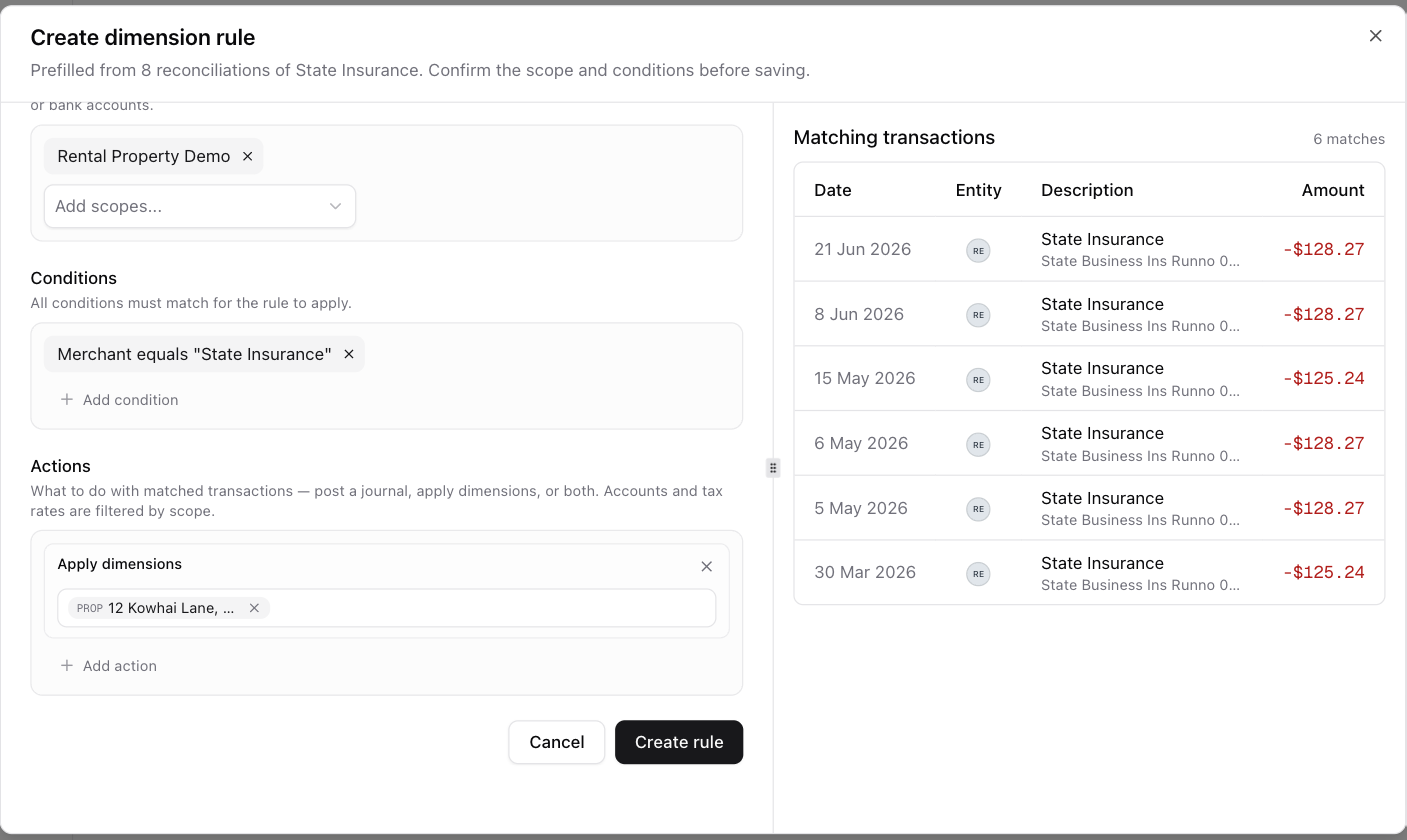
Nothing is saved until you press Create rule in the editor. Check the scope in particular: a suggestion is scoped to the entity the pattern was seen in, and widening it to the whole workspace is your call, not ours.
Once the rule exists it stops being suggested, since the rule now answers that question for you.
Reporting by dimension
Reports pick up two new controls once the selected entity has dimensions.
Filtering
Profit & Loss, Trial Balance and Balance Sheet each gain a Dimensions filter. Options are grouped under their dimension, and you can tick several at once — three properties out of five, say — without exporting anything to a spreadsheet.
Segmenting the Profit & Loss
The Profit & Loss adds a Segment by control. Choose a dimension and the report renders a column per option, with an (unassigned) column first so anything untagged is impossible to miss. Select a second dimension and its columns are added too, each prefixed with the dimension name.


Filtering and segmenting are alternatives rather than a combination — the Dimensions filter is unavailable while a segmentation is applied. Your selections are held in the report's URL, so a segmented report can be bookmarked or shared as-is.
Archived options behave the way you would want: they disappear from the pickers so nobody tags new transactions with them, but they still appear in reports covering periods where they carry data, marked (archived). History stays intact, and current-period reports stay tidy.
Not here yet
Dimensions have just landed, and some of the surrounding pieces are still to come. So you know where the edges are:
- Bulk assign — there is no "tag all of these at once" action on already-reconciled transactions yet, and no filter for finding what is missing a tag.
- Balancing journals for you — you currently tag both sides of a manual journal yourself. Xero solves this with automatic tracking transfer accounts, and we plan to do something similar; the check is a safeguard in the meantime.
- Fixed assets — depreciation journals cannot yet be attributed to a dimension.
- GST returns and report packs do not yet filter or remember dimension selections.
- Consolidating existing entities — if you currently run one entity per property, the tool to merge those into a single entity with one option per property is still being built. Please talk to us before restructuring anything.
Making a dimension Required currently applies across the entity rather than to chosen accounts — worth bearing in mind if you have accounts, like bank fees, where a property tag is not meaningful.
Need help?
If you are setting dimensions up for a client and want a second opinion on how to structure them, click the 💬 button in the app or email help@prosaic.works. We would genuinely like to hear what you are tracking — it tells us which dimension types to build out next.